My DIY Darling journey.
Power Corrupts!
When CK Kok, resident guru on DIY Den had an article on a very simple 2A3 based
single ended amplifier, I don’t have to tell you there’s this bloke here
grinning ear to ear. Like what "Tok Guru" said, once you listen to
some low-power SE magic, your life’s changed for good! You won’t go back to
anything else after that. I know the day when audiophiles appreciate the magic
of SE amps and high efficiency speakers is a long long way to fruition. After
all, the very idea of so few watts bringing so much magic is alien to this
industry where the likes of mega-power behemoths with electrical consumption
higher than your electric kettle is hailed. So, here let me share with you
my journey on an amplifier that consumes less energy than this PC I’m typing
on…
Like most Malaysian audiophiles, I look forward to
Thursdays as every Thursday is The Star’s Audiofile day. That particular fateful
day is when Audiofile had an article focusing on DIYers. Hmm… the idea
appealed greatly to me. If gears are expensive, why not build one yourself?
Sounds good. Also, if I could pull this off, this will be one MASSIVE boost to
my ego. Hee hee hee… Also, that particular article led to me this mailing
list, Kuala Lumpur Audio NutS.
A few correspondence on KLANS later got me REALLY
serious into considering DIY. Credit goes to that bloke with a tube nickname…
You know who I’m talking about!
Aha! Time to brush up my electronics! But my
affinity of falling asleep when holding a
telephone-directory-sized-mashed-tree-pulp didn’t bring much progress.
Fortunately, for my generation, there is the great World Wide Web and off I go!
I found a really wonderful site, Nelson Pass’ http://www.passlabs.com
that explains electronics very beautifully to me. Nelson Pass not only has a
gift in electronics, he has also the talent of bringing "life" into
the very dry subject of electronics.
Another benefit of Pass’ website is the various
DIY projects there. Particularly interesting is his 10W Zen amp. Now Nelson
Pass is a serious proponent of class A and I can’t agree more with him. Class A
is most linear with least noise though a lot less efficient, which thankfully, homebuilders
can get away with. Anyway, this got me itching towards
building my own Zen amp. Hey, with tag lines like "Less is more", can
you out-Zen Nelson Pass?
This point in time, I was dead set on Class A and
MOSFETs seem to marry the convenience of solid state and sonic quality of tubes.
However, one day on the KLANS mailing
list this guy, Shamsul Bahrin, was waxing lyrical non-stop about his 0.7W
Darling amp. What? 0.7W? Are you kidding? Is this even enough to swat flies? I
then realized this guy must be serious when he’s putting aside expensive makes like
Jolida and Rogers to listen to his Darling. Hmm… the fact that tubes are
much sexier to look at is another plus. Hence a few e-mails to Shamsul later and
I finally found ‘Papa Darling’ — Bob Danielak.
Legend has it that Bob built an average-sounding amp
but stumbled across some cute looking tubes in a surplus store one day. He tried
them in this amp and the sound impressed him greatly! After optimizing the
circuit, he gave it freely on his website to anyone crazy enough to go a gaga
over 0.7W. One of these guys is Rick Francis who’s used to building huge mammoth
sized amps, so when one day he built the still-unnamed-tiny-amp, Rick’s wife
took a liking to it and said "what a darling". And there you have it!
The Darling!
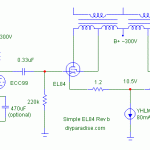
It’s easy to see the popularity of the Darling.
First, the choice of output tube, the 1626 which is an unknown in the audio
world. It’s actually a RF oscillator and the curves don’t look good on paper at
all but it is Bob’s ingenuity to operate this tube at a region where it works
best for audio. Kudos to Bob. Secondly, the 1626 is a very cheap tube. Thanks to
it’s non-audio pedigree, these tubes are available at next to nothing. How about
USD3 per tube? (The 1626 is a victim of its own success, it’s hard to get
them at USD3 these days.) And this is NOS Sylvania, RCA, Tung-sol, Ken-rad, Hytron…
Compare this with a pair of Western Electric 300B that cost 300 times more expensive and it’s easy to
see why it’s popular. Oh yeah, plus Bob utilizes cheap components in the
Darling. Any half-baked designer can take some boutique parts and assemble into
a good sounding amp but it takes talent and vision of a genius to do some with
cheap parts. The output transformer is a Hammond 125SE that puts out a sound that
belies its cost. How much to build a Darling? How about less than USD300? Since
it’s "cheap and good", we got a winner here.
Thirdly, another DIYer, Gary Kaufman, organized
mega sales of the 1626. He cut deals with surplus stores and shipped literally
hundreds of these "poor man’s 300B" to many crazy DIYers.
Which brings to this DIYer-wannabe. After visiting
Bob’s website, I longed to listen to the Darling in action but Shamsul stays too
far away in Kota Kinabalu. Well? What choice do I have? Build one!
I began to acquire all the parts I need. As a
total greenhorn, I really paid more than I had to on lots of components. Next
came the most laborious part – planning. My dad always tell me "when you
fail to plan, you plan to fail". Plus the fact that I’m going to deal with
260VDC here makes the above words more pertinent… After consulting some tube
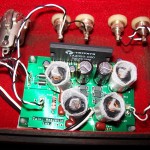
gurus on the layout, I began to build.
Utilizing some bench drills at the workplace, I
had a steel plate cut and drilled but it was really more work than necessary.
Stupid me chose stainless steel and this thing is really tough! I got some help
along the way but only realized how hard stainless steel is when I had to do
some filing myself. You see, octal sockets to fit the 1626 is 27mm in diameter
while the biggest drill bit available to me was a 26mm. Filing off this 1mm took
me one whole hour! (I wonder how tough is "buns of steel"?)
A couple of late nights later, I finally got it
assembled. The thought of while the rest of the population drifts off to
Dreamland, and I’m creating magic, makes me
feel good… After powering up (and running away lest it explodes and bring down
the whole neighborhood), all voltages measured okay and I was itching to play
music already! But you are not going to try on your expensive speakers right?
Where to find cheap speakers? I had an idea but I still feel bad over this…
anyway, I went ahead and ripped off my car speakers…
Pressed ‘play’ and… hooray! I have music! It’s
singing! Another Darling is born! The Gods must be smiling on me! I still
remember the exact date, 10 March 2001, that’s how momentous this has been. (to
tell the truth, a buddy had a durian bet with me to complete this amp by this
date after hearing me talk about it for 2 agonizing years.) But something is not
right. It hums, badly but its character is there and I could swap tubes! I put
in the RCA 1626 and it sounded sweet. Hey, you folks listening to sand amps, try
to do this!
A few consultations on the Net later, I began
my mission with vengeance: to eradicate hum from mankind, once and for all.
Okay, it’s not that grandiose but the action plan is this:
- twist tightly filament heating wires. At least
3 knots in an inch. This cancels out, to some degree, stray magnetic flux
from each wire. - grounding heater center taps or elevating it to
some higher potential. - grounding the chassis.
I tried all 3 and hum is gone. I’m happy! I have
my music and it’s hum free!
So I thought… Then I hear hum again. This time
it’s more menacing. Sometimes you hear it, sometimes you don’t. Talking about
The Phantom Menance…
This bugged me for quite a while until one day
when music was playing and hum was singing, I accidentally touched the RCA
shield of my interconnect and… DEAD SILENCE. No hum at all! Huh? I found out I
haven’t grounded the chassis after all! Oh well, a simple wire and that’s it! No
more hum!
[As an aside, please be reminded that this
"one finger poke here and there" tweak is no solution to audio
problems. I had the learning experience of electrolytic capacitors discharging
its contents on my fingers not once, but TWICE. Whoever said "once bitten
twice shy" obviously haven’t met me yet.]
There you have it! My journey to ecstasy! SE
magic!
Part 2. Romancing the Darling…
Romancing the Darling…
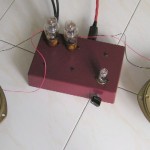
Alright! I now have my Darling singing but the fun of DIY has just begun…
It was not until a year later that I had my chance
to romance my Darling. You see, I now have my pair of 97dB sensitive Hammer Dynamics
Super 12 up and running! Previously, when driving a pair of 86dBs I had to
listen nearfield and to material with limited dynamic range. Now that my Hammers
are up and running, my Darling is able to flex her muscles. Oh yeah!
The sound is good, the sound is nice. Any
deficiency easily masked by the achievement so far but "itchy hand"
strikes and you are eager to find out how far you can go. But upgrading your DIY amp is different
from other audiophiles. Instead of buying/selling amps/speakers/CD players/cables etc,
you focus on the internal organs, the components.
Step by step
The first upgrade I did was change the coupling
capacitor from a local make to Auricaps. Both are of the same material,
polypropylene. Wow! If previously I could hear some echo and an overly
emphasized lower midrange. This is now gone! And I thought those were artifacts
from the Hammers. It is as though a teacher took a cane to discipline her and my
Darling behaves a lot more nicely now.
Then came the next upgrade. I took out the
Auricaps and put in the Jensen copper foil paper in foil capacitors. Now, this
is one massive cap. It’s much heavier and cost more than twice the Auricaps. Put
them in and… my goodness! The sound changed so much it’s like changing amps!
No, I’m not talking about subtle changes here but BIG MASSIVE CHANGES. Albert Au
sounded so romantic now, while warm sounding vocals like CaiQin becomes too syrupy, too thick. Huh? Looks like the Jensens work great with low husky male
vocals while the Auricaps love to gyrate with femme fatales more.
Out came the Jensen and in went the Auricaps. And
I played music for days…
But then I read that paper-in-oil capacitors need
some hours to break in and that few hours of playing the Jensens surely didn’t
do justice to it. Okay, let the Auricaps play for a week first, familiarize with
the sound first.
So I thought.
A week later, took out the Auricaps and put in the
Jensens. This time, I got the Jensens in a different orientation. Though they
don’t come with a recommended orientation, Jensens recommend experimentation as
to which orientation sounds better. This time I got the foil side connected to
the input. Played music and…
Nope. It was totally different from the previous
experience. The Jensens don’t sound so thick like before but what’s amazing is,
you hear more treble and bass takes more definition. What’s better is, the
critical midrange is smoothened out somewhat. Great stuff here! Albert Au doesn’t
sound so romantic like before while CaiQin is a hell lot more listenable than
before. This
is more like it! More hours of playing later and this character remained
unchanged. Great!
However, please bear in mind that this in no way
endorses the Jensens over the Auricaps. Each system will work with each
component. I know of guys whose Auricap worked best while some found Jensens
better. The keyword here is EXPERIMENT. Also, in a single ended amp, with so few
components, parts quality is downright critical. A change of ONE cap is enough
to make you go bonkers. The difference is night and day! As such, use these caps
like how you would like spices. A dash here and there to impart its sonic
flavour.
The next step I did was to put back the cathode
bypass capacitor. You see, when I encountered a problem with the Darling
earlier, silly me clipped off the leads of this cap too much. As a result, I
couldn’t use it anymore. Now that I bought some new caps, better fit them
in. And the sound…
Much louder! All this while, without that
cathode bypass cap, input headroom was compromised. Piano edges, transients
became distorted. With this cap in, the Darling is playing more like a 0.7W.
Previously, I must have been listening at something like 0.4W! Also, with this cap, I
gained more bass, and smoother midrange as well. This is too good! By the way,
this is the great value Elna Starget. A change later to Elna Cerafine, I didn’t
hear THAT much improvement.
Detour
As I enjoy myself with this journey so far, I
begin to ask this question. What is the reference? Sure, a change of caps here
and there changed the sound but is the change for better or for worse? How do
you know? I mean, I used Norah Jones many times as a reference for my changes but
how do I know I’m attaining the right sound? How do I know her voice is
supposed to be like the way it’s playing in my system? Listening on a different set, that
sound is a combination of her vocals, her
music IN THAT SYSTEM. No matter how transparent your system is (if this is your
goal) your system still imbues its character to the music you are listening
to.
So is Norah Jones’ voice raw and edgy? Sweet and
sultry? How do I
know? Of course the ideal way would be to kidnap her and get her to sing for you
IN YOUR ROOM, then voice your amp, your system accordingly to best approach her
voice IN YOUR ROOM but, sadly, this is not a practical option. (If only I have
my way…) I heard the designer of Harbeth speakers did exactly this. No, not with Norah Jones but with
his daughter’s voice.
So what does this leave us DIYers? Our frame of
reference is still an interpretation. Well, after thinking for a while, maybe I
should change my approach. Instead of voicing my system to be transparent
sounding, why not voice it to give you the most musical ecstasy? To the point
that the very vocals are still distinct and has its own character, whatever this
frame of reference can be. I mean, Diana Krall should sound a lot different from
Norah Jones, should sound a lot different from CaiQin and so on… Oh
well…
Back to itchy hands!
The journey continues! Then I got myself some
power supply chokes. You see, my current power supply is a capacitor-resistor-capacitor
filter. With this choke, I can replace the resistor with it and it now becomes
capacitor-choke-capacitor. Chokes work by regulating currents and in a SE amp
where there is an appreciable amount of DC current, chokes seem like a godsend.
Okay, I took out the resistor and replaced it with a 10H 120mA choke. Played
music and…
The character changed so much I simply can’t
believe it! First, I thought I heard less volume. It doesn’t seem to play as
loud as before but more warm-up later, it’s not that I’m hearing less but that
the stage has moved backwards! Previously, when Norah Jones sings, she’s
standing just in front of you, but she’s much larger than life! Now, with the
choke, she’s moved backwards somewhat and she’s more lifelike in scale! The
stage begins at the speaker face and extends backwards. Wow! Also, if you listen
carefully, bass does go deeper, there’s more definition there and the sound
overall is smoother. Great stuff! Don’t tell me how a simple choke brings about
such a big change!
Few weeks passed by, then some NOS output
transformers arrived. At the moment, the Hammond 125Es, due to their 100Hz
cutoff, doesn’t allow the Hammers to flex its bass muscles. I thus bought this
pair of NOS output trans to try and see if it betters the Hammonds. Put them in
and… this is disappointing. In place of the Hammonds, the music now is dull,
dull, dull. Frequency extension is even more limited than the Hammonds. Forget
about the bass, there’s not much treble either. Looks like a bad purchase.
Oh well, this is not the end of the world.
Retaining the NOS output transformers, I added the Hammonds in as well and
rewired the whole mess so that the NOS output transformers play the role of
plate choke while the Hammond resume output transformer duties. Also, fitted
huge, massive, great-for-ego 5uF oil caps. What is all this mess, you ask?
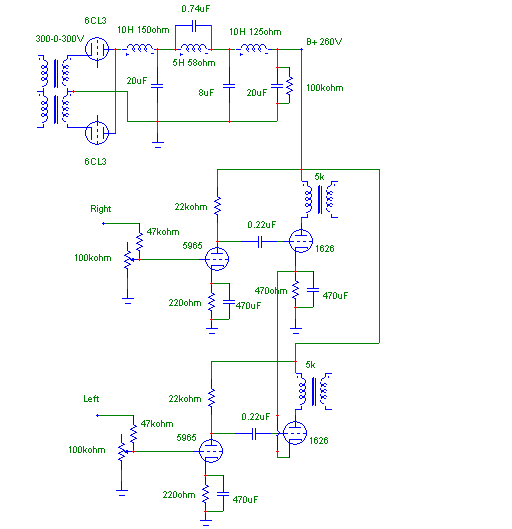
 |
Well this circuit arrangement is called shunt feed, or parallel feed, or just plain parafeed. What we have now here is that a plate choke loads the output tube and allows only DC current to flow through. The oil cap blocks DC from flowing through the output trans. As such, when signal is present (AC), it’ll go through the output transformers. This means that the output trans doesn’t seem any DC flowing through it. As such it doesn’t need an air gap. This should be easier to fabricate, with better material, smaller in size… all the goodies! |
Yeah, enough of techno babble. After some REALLY
messy wiring, played music and… Cowabunga! This is even better than before!
No, the character hasn’t changed much but the bass has! I get more bass
extension now. This is no more a 100Hz roll-off. It rolls off lower though at
quite a steep slope but the fact that it goes lower gives me the smiles! I love
this! Later, I then tried Ultrapath, a circuit configuration that feeds the
signal BACK to the output tube cathode but didn’t hear much difference.
Is this the end?
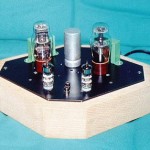
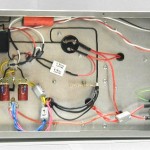
Not really but I had to rebuild my
Darling as I ran out of space to for my DIY fun. This time though, I broke my own rule. I changed too many things at one
time so I really can’t tell which caused what changes. Changes are all in the
power supply section. Power supply filter is now choke input instead of
capacitor input. Power supply filter capacitance is greatly reduced. Additionally, tube rectifiers in the form of
ultra-cool TV damper diodes is now being used rather than the earlier sand
rectifiers. Now have 2 power transformers as well, one for B+ while one for
filament. Oh yeah, I took this opportunity to upgrade to a much beefier B+
trans. Used to be 60VA, now it’s 150VA when I actually only need less than
30VA… There’s lots of iron now. 2 power trans, 3 chokes, 2 huge ‘sardine
can’ oil caps… All this just for the power supply.
Signal circuitry still remains unchanged but
Auricaps were put in instead as they were of a more transparent nature, thus
easier to listen to the changes in the power supply. Built the whole thing on 2
pieces of plywood. One for the power supply (this weigh more than 10kg!) and
another much bigger piece for the signal section.
It took only 2 days to build but a few days to
reduce all the hum. On wood chassis, it’s harder to work against hum as you
don’t have a metal chassis to ground all the hash away but all rules concerning
signal ground, earth ground and AC filaments still have to be observed.
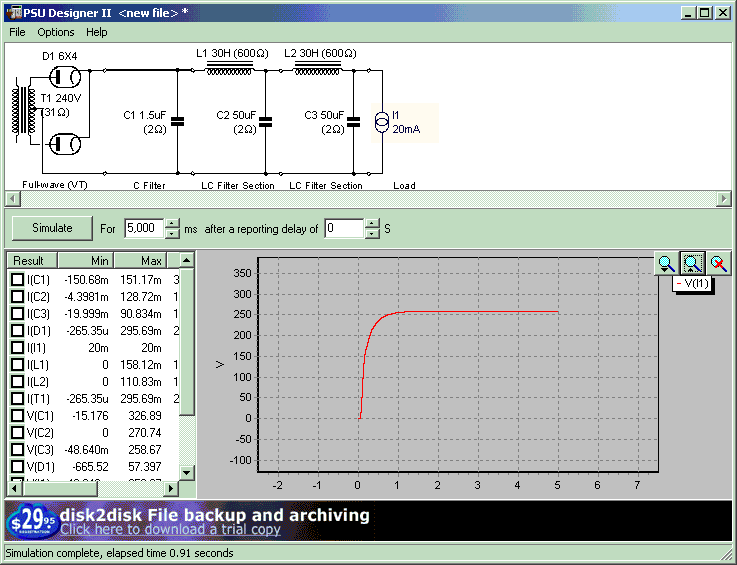
With all that done, there’s still an evil 1V
ripple riding on the B+. On this power supply, circuit simulation showed only
10mV but I’m seeing a lot more. So much for simulation… Anyway, tuning the
choke to 100Hz should reduce this ripple by some tenths of dB.
Though the choke is rated for 5H at 250mA and calculation shows a 0.5uF cap,
putting this cap in had almost nil difference. Huh? Well, 5H is measured AT
250mA but we now have only 70mA, so the inductance is actually higher. How much
higher? No idea but slowly paralleling the caps, adding 0.1uF at a time and
slowly bring you to the right point.
I did exactly that and it was the toughest part of
rebuilding the Darling. Finally a capacitance of 0.74uF gave total SILENCE on my
97dB Hammers. Calculating back, the choke seems to be only 3H… So much
for measurements…
Oh yeah! Took the opportunity to wire in the
Hammond 125ESE instead of the earlier 125E. Another variable.
The sound?
Glorious! Actually I can’t actually remember much
about my earlier Darling sound but there’s unmistakably much more BASS and the
system is pretty punchy! Bass is quick, I attribute to the low capacitance in
the power supply. JC Morrison used to say those systems touting hundreds of
microfarad always boast on its ability to release a torrent of energy at a pin
drop but no one ever says how long it takes to recover itself.
I tend to agree here.
Imagine a few hundred micro-farad in the power
supply. Yes, the first bass note goes deep, almost exhausting all its charges
but it needs TIME to recharge itself for the next assault. This much capacitance
takes time to recharge fully. If it doesn’t fully recharge, the subsequent bass
notes suffer.
But in a system of much lesser capacitance, the
charge and discharge cycle can be pretty quick, thus more in time with the
music.
Anyway, this is just what I think. It’s worth
SQUAT in the grand scheme of things. Who cares as long as you are enjoying the
music? And I’m glad to say that the humble little Darling, with its 0.7W worth
of Class A SE is worth every 0.1W of them.
Dear Sir,
Reading your article and one of Auw Jimmy-jimmy junkyard-saturday 25th april 2010, the position of the Jensen can be importand. My question: if reading the text of the Jensen on which side you take the negative side? At the right hand? How long you take for break-in?
with my best regards
hi ton
the lower impedance side is that end with a vertical line on it. if my memory is still good, it should be on the left if you were to hold the cap with the jensen text in front of you.
how to run in? it has been a while… i think a few weeks?
yeo