Simple 5687-based preamp
Do you fancy a simple DIY project? So simple and so cost-effective that it gives you the most bang for the buck? And let’s stay away from popular (and hence expensive) audio tubes like 12AX7, 12AU7… Here’s 2 very simple linestage preamps. The first credit goes to Audio Note. It’s called the Audio Note M7 preamp. The second is a modification of it by KLANS resident DIY guru, Mr. vt4c. Here’s some reasons why this project is so mojo. 1. A very linear and inexpensive tube, the 5687. Some people question the pedigree of this tube. They are nuts. You can question Audio Note’s decision to use it in the quarter-million RM Ongaku or their best selling M7 preamp! : ) 2. Use of tube rectifier here. Yes! It just sounds better! 3. Some folks have used it to drive their mega-expensive solid state power amps and found that it improves the sound of their gear. At the price of this project (less than their interconnects), it’s a no-brainer. 4. It’s a simple enough project for you to cut your teeth on DIY. You can move on to greater things from here. 5. This is a really cheap project! I would estimate you could do this for less than RM250. That’s right. I love #4 as this project is a good/simple way for you to cut your teeth on DIY. Once you learn what works, and what doesn’t, once you learn the cost-effectiveness of DIY, you can fly! All right, which circuit? Here is Audio Note’s M7 preamp.  Here is vt4c’s M7 preamp. There’s actually a full write-up on The Star’s DIY Den but there’s no schematics there, so this should complement that page.
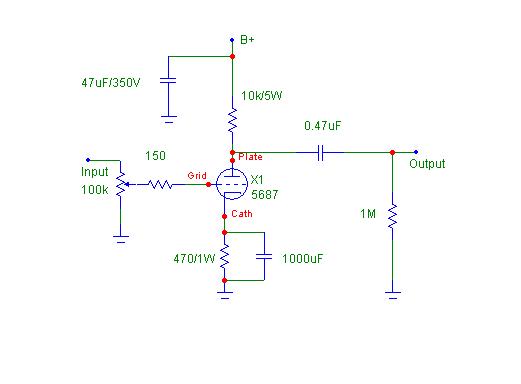 |
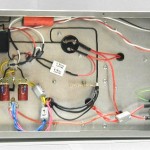
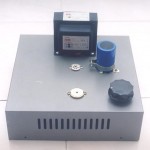
Other than the above, you need also the datasheet of 5687 and 6X4. If you need the 5687, 6X4 tubes, sockets, capacitors and tagboard, you can get from me, from this page. If you need to build the power transformer, this vendor here can get one done for you at a very good price. I have no affiliation with this winder, so there’s no middle-man charges here. Oh yeah, with end-bells as well. Mr. Tan Tonsin Components 30, Argyll Road 10050 Penang Tel: 04-2644691 or 04-3703303 Fax: 04-2620169 Alternatively, you could also ask this vendor. I have more confidence with EKK as they flash test their transformers before handing over to you. Don’t be suprised by this as almost all the local transformer winders I know of DO NOT run this test. They (the transformers, not the people) are ugly though as they don’t come with end bells. Runs slightly hot but the voltages with load hasn’t failed my expectations. Miss H’ng EKK Supreme Electronics 411 Jelutong Road 11600 Penang Tel: 04-282 2897/282 2855 Fax: 04-282 2855 Sorry, I haven’t tried other transformer winders. There’s one I tried but opinion has been mixed, so I’ll leave it as that. A suitable power transformer specs will be 12.6V@2A, 6.3V@2A and 200-0-200V@100mA, for Audio Note’s circuit. This is, of course, just a guide. You can definitely steer away from this. You could even use a single 6.3V@4A heater for both 5687 and 6X4 tubes though this isn’t recommended. vt4c’s circuit specifies power trans of 350-0-350V@100mA, followed by 10H, 50uF, 10H, 50uF. Topology is shown below. That’s all to it! Simple enough? Think you can wire a transformer, a few resistors, few cap and 2 tubes correctly? More information will be available on this page later. Update on 6 January 2003: I’m back! I’m more than back! I built vt4c’s circuit but with my own power supply. Here’s the circuit:  I actually asked for the power transformer to be winded 350-0-350V but the winder got it wrong and gave me 330V only. Anyway, it still works out okay. Damage: Signal circuitry
| Raytheon 5687 | RM40 |
| Philips 6X4 | RM24 |
| Auricaps 0.47uF 600V | RM50*2 |
| Elna Cerafine 470uF/25V | RM6*2 |
| Resistors | RM2 |
| RCA jacks | RM8 |
| Alps volume pot | RM80 |
| 7-pin tube socket | RM10 |
| 9-pin tube socket | RM12 |
| *** | *** |
| Power circuitry | |
| Power trans | RM40 |
| 30H Hammond choke | RM80*2 |
| F&T 50+50uF/500V | RM42 |
| Chassis | RM20 |
| Preparing chassis | RM0. This is how I stay fit! |
Lesson learned from this project : Trust me, you’ll appreciate this later. This little project lays the path to DIY a simple power amp to go with this preamp. Okay, but thought you mentioned that this preamp will cost less than RM250 to build? Well, you COULD get it down that low. Try to minimize bulk in the power supply. Maybe you want to just use a simple CRC filter ala Audio Note’s circuit. You save 2 chokes. Instead of using the Alps volume pot, you could build a cheap stepped attenuator ala Bottlehead’s Sweet Whisper from this article. You could use Auricap 1uF 450V at RM32 each as well. There you go! I built it with whatever I have on hand though I’ll say the sound will change somewhat if you take out the bulk from the power supply. I like chokes and I’ll stick that in. Your milage may vary… Coming soon! Photos and step-by-step (almost) tutorial on how to build this simple 5687 preamp. Update on Jan 9, 2003: It’s ready! How to build your own tube preamp. Update on Apr 6, 2003: Preamp update!. diyparadise.com


😆 Hi, what is the p-p voltage swing capability of this preamp?
well, mu is about 20, but cathode sits at 5v so it shouldn’t be more than 100v. this is a theoretical value.
What is the gain for this simple 5687 preamp?
hi sim
well, mu (gain) of 5687 tube is about 20. with resistor loading at the plate, you will get slightly less than that.
i googled common cathode gain calculator, plugged in 10kohm for plate resistor, 2kohm 5687 plate resistance, and mu of 20, i got around 16x for gain.
yeo
thank you so much! Googling “simple preamp DIY” turned up your page.