Building the Simple EL84
Okay, actually building this integrated amp is a piece of cake. But I took so longggggg…
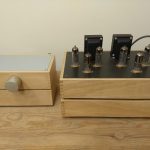
Chassis
I was determined to make a nice amp as my previous attempts all have a “frankensteinian flair”. So I took extra trouble to get the chassis done up really nice. Got hold of a nice piece of 1mm aluminium chassis. 1mm sounds too thin right? But it’s holding up almost 20kg of iron pretty well right now. Anyway, took me 1 day to drill all the holes I need. 1 day to paint and… an eternity for it to dry!
I used hammertone paint here. Was told that “they’ll dry within an hour”. Really? Okay. Applied first coat (diluted with thinner of course) and left it under the sun to dry. An hour later, was happily applying second coat when I noticed the previous coat was “moving”! Dang! Needless to say, third coat was many hours later. Still not fully dried. Got fed up. Became desperate. Left chassis under the sun. Left it in the car parked under the sun… I thought this should be okay right? But as I grabbed the chassis, I left my fingerprints everywhere! Grrrrr!
Wiring
Seriously, watching paint dry has never been this interesting. Okay, enough talk about the chassis. Made me mad! Wiring is straight forward. Was determined to do it nicely this time as well, but my attention span only lasted a few solder joints. After that was sloppy, sloppy, sloppy job again… Now you know me. But when I rebuilt the power supply circuitry (to kill hum) I rebuilt the signal circuitry as well, using tagboards. Everything looks neater now, but this is relative.
Testing
Testing is easy. Just make sure all voltages are pretty close to that on schematics and you are fine. Sometimes you get a big difference and it could be either your incoming VAC or your heater voltage being out of whack. So check your incoming VAC and heater voltages as well.
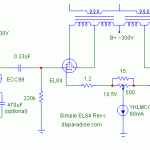
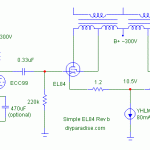
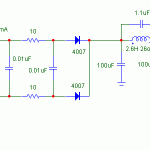
Does the power supply circuitry look different? Does the 1.1uF cap bother you? Without the 1.1uF, the ripple on the power supply is about 40mV. With this cap, it went down to single digits. You can read more about it here.
First build
My first build gave me bleeding highs. My ears bled when I hear the highs. Even violins are horrible. What’s wrong? Guru YH suggested the phase splitting isn’t up to mark. Basic electronics tell you that you can improve the phase splitter performance quite easily… but that is another article…
Anyway, as I attempted to kill whatever hum that I was still having, I rebuilt the power supply AND rebuilt the signal circuitry. The layout looks cleaner now. Fired it up and… the highs are okay! Whatever I did wrong previously, I must have done it right this time.
Listening
Critical listening revealed several flaws. The sound is veiled, muddied. The highs are okay but the bass is quite rolled off. Also, you need to crank your volume pot quite high… Hmm…

Hi Yeo,
thanks a lot for sharing your knowledge.
It gives me the impultion to start building my own EL84 amp. I live in France do you have any recommendations for the power supply transformator. I can’t find a good reference that fits your specs.
Thanks a lot.
Ludovic
hi ludic
bon jour!
you can start off with this.
http://diyparadise.com/shop/index.php?main_page=product_info&cPath=7&products_id=25
you don’t have to get exactly the same specs as the power transformer/choke shown on this page, but it’s a good start.
show me what you have and i’ll try to help you.
yeo